Topics

Feb 5, 2011

Change the picture that appears on the Welcome screen and on the Start menu in Windows 7

To change the picture that appears on the Welcome screen and on the Start menu, perform the following steps:
1. Click Start button, and click Control Panel.
2. Click on User Accounts and Family Safety.
3. Under User Accounts, click on Change your account picture.
4. Select one of the pictures that appears in the Change your account picture window or click on the Browse for more pictures... link to select a picture from a location from and then click Change Picture.

Change the size of the icons in the Start menu in Windows 7

By default, large icons appear on the Start menu. You have the Use large icons check box that you can use to have large icons or not to have large icons on the Start menu. Perform the following to use this setting:
1. Right-click on an empty space on the taskbar and click on Properties.
2. From the Taskbar and Start Menu Properties dialog box, click on the Start Menu tab. Click the Customize... button.
3. From the Customize Start Menu dialog box, in the You can customize how links, icons, and menus look and behave on the Start menu. section, scroll and click to place or clear the check mark beside Use large icons.
4. Click OK to close Customize Start Menu dialog box.
5. Click Apply and then click OK to close Taskbar and Start Menu Properties dialog box.

Add Run command to the Start menu in Windows 7

By default, Run button does not appear on the right pane in the Start menu. To add Run button to the Start menu, perform the following:
1. Right-click on an empty space on the taskbar and click on Properties.
2. From the Taskbar and Start Menu Properties dialog box, click on the Start Menu tab. Click the Customize... button.
3. From the Customize Start Menu dialog box, in the You can customize how links, icons, and menus look and behave on the Start menu. section, scroll and click to place a check mark beside Run command.
4. Click OK to close Customize Start Menu dialog box.
5. Click Apply and then click OK to close Taskbar and Start Menu Properties dialog box.

Search for programs from the Start menu in Windows 7

Click on the Start button, type in the name of the program or file in the Search programs and files field.

Restore default settings to Start menu in Windows 7

To restore default settings to Start menu, perform the following steps:
1. Right-click on an empty space on the taskbar and click on Properties.
2. From the Taskbar and Start Menu Properties dialog box, click on the Start Menu tab. Click the Customize... button.
3. From the Customize Start Menu dialog box, click on Use Default Settings button.
4. Click OK to close Customize Start Menu dialog box.
5. Click Apply and then click OK to close Taskbar and Start Menu Properties dialog box.

Adjust the number of recently opened programs from the Start menu in Windows 7

In Microsoft Windows 7, by default 10 programs are displayed on the left pane under the pinned programs (if any programs are pinned). You can adjust the number of programs by performing the following steps:

1. Right-click on an empty space on the taskbar and click on Properties.
2. From the Taskbar and Start Menu Properties dialog box, click on the Start Menu tab. Under Start menu size section, enter the number in the Number of recent programs to display:.
3. Click Apply and then click OK.

Clear recently opened files from the Start menu in Windows 7

Click on the Start button, right-click on Recent Items and click on Clear recent items list to clear recently opened files from the Start menu.
If you open files after performing the above then the recently opened files will appear under Recent Items. To clear this list permanently, perform the following:
1. Right-click on an empty space on the taskbar and click on Properties.
2. From the Taskbar and Start Menu Properties dialog box, click on the Start Menu tab. Under Privacy section, click to remove the check mark beside Store and display recently opened items in the Start menu and the taskbar.
3. Click Apply and then click OK.

Clear recently opened programs from the Start menu in Windows 7

The list of recently opened programs appears on the left pane in the Start menu. By default 10 programs are displayed in the list. If you choose to clear the recently opened programs then perform the following steps:
1. Right-click on an empty space on the taskbar and click on Properties.
2. From the Taskbar and Start Menu Properties dialog box, click on the Start Menu tab. Under Privacy section, click to remove the check mark beside Store and display recently opened programs in the Start menu.
3. Click Apply and then click OK.

Remove a program icon from the Start menu in Windows 7

To remove a program icon from the Start menu, click the Start button and right-click the program icon you want to remove, and then click Remove from this list.
Note:
Removing the program icon from the Start menu list will not remove the program from All Programs or will not uninstall the program.

Pin or unpin a program to the Start menu in Windows 7

You can pin a program to the Start menu by right-clicking on the program and clicking on Pin to Start Menu. The program that you need to pin on the Start menu can be located on the left pane of the Start menu, or in the All Programs list, or on any location on your computer.
You can also pin a program by dragging the program. If the program appears on the left pane of the Start menu then left-click on the program and release the mouse button when you see Pin to Start menu. If the programs appears in the All Programs list, or on any location on the computer then drag the program to the Start button. When you see Pin to Start menu, release the left mouse button. Now, the program will be pinned to the Start menu.
Note:
Jump Lists contain recently-opened items and appear next to pinned programs.

To unpin a program from the Start menu, right-click on the program and click Unpin from Start Menu.

Add Windows Update program link to the Start menu in Windows 7

In Windows 7, you can easily add the Windows Update program link to the Start menu by performing the following:
1. Click Start button. In the Search programs and files field, type windows update to display Windows Update.
2. Left click and drag the Windows Update program over the Start button, All Programs. Release the Windows Update program when the tip text for Windows Update program displays Create link in Programs.
3. Right-click on the link for Windows Update and click on Rename to rename (if needed).

Change the power button action in Start menu in Windows 7

In Microsoft Windows 7, when you click on the Start button, in the right bottom part, you have the Shut down button. Options like Switch user, Log off, Lock, Restart, Sleep, and Hibernate appear when you click or hover the mouse over the right-side pointing arrow that is to the right of Shut down. You can change the power button from Shut down to one of the options as mentioned earlier. To do this, perform the following steps:
1. Right-click on an empty space on the taskbar and click on Properties.
2. From the Taskbar and Start Menu Properties dialog box, click on the Power button action: drop-down box and select one of the following:
  • Switch user
  • Log off
  • Lock
  • Restart
  • Sleep
  • Hibernate
3. Click Apply and then click OK to close Taskbar and Start Menu Properties dialog box.
To shut down the computer, click or hover the mouse over the right-side pointing arrow and click Shut down.

Move the Start button in Windows 7

The Start button is located on the taskbar. You cannot move only the Start button. You have to move the taskbar to make the Start button move along with it. To move the taskbar, perform the following steps:
1. Right-click on an empty space on the tasbar and click on Properties.
2. In Taskbar appearance section, click on the Taskbar location on screen: drop-down box, select Bottom, Left, Right, or Top to move the taskbar, which holds the Start button to the bottom or left or right or top.
Note:
In versions of Microsoft Windows prior to Windows 7, you have to right-click on an empty-space on the taskbar and remove the check mark that is beside Lock the taskbar to move the taskbar. In Microsoft Windows 7, you can perform the move operation without having to remove the check mark that is beside Lock the taskbar. You may see Step 2 for information regarding this.

Add or remove items such as Computer, Documents, Control Panel, Help and Support from Start menu in Windows 7

In Microsoft Windows 7, you can customize the Start menu by adding or removing items such as Computer, Connect To, Control Panel, Default Programs, Devices and Printers, Documents, Downloads, Favorites menu, Games, Help, Homegroup, Music, Network, Personal folder, Pictures, Recent Items, Recorded TV, Run command, System administrative tools, and Videos. To add or remove items, perform the following steps:
1. Right-click on an empty space on the taskbar and click on Properties.
2. From the Taskbar and Start Menu Properties dialog box, click on the Start Menu tab. Click the Customize... button.
3. From the Customize Start Menu dialog box, you may:
  • Click on Don't display this item radio button to remove the particular item from the Start menu.
  • Click on Display as a link or Display as a menu radio button to add the particular item to the Start menu.
  • For checkbox selection type, if a checkmark appears beside the item then it will appear when you click the Start button.
4. Click OK to close Customize Start Menu dialog box.
5. Click Apply and then click OK to close Taskbar and Start Menu Properties dialog box.

Items such as Computer, Control Panel, Documents, Downloads, Games, Music, Personal folder, Pictures, Recorded TV, System administrative tools, and Videos have the radio button option to choose the appropriate selections.
Items such as Connect To, Default Programs, Devices and Printers, Favorites menu, Help, Homegroup, Network, Recent Items, Run command have the check box option. If these items have a check mark beside them then the particular item will be displayed in the Start menu. To remove the item, uncheck the check box.

Stop highlighting new programs on Start menu in Windows 7

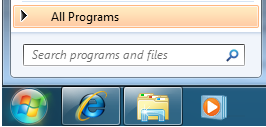
When you install a new program and if the program entry is listed in the Start menu then when you click on the Start button , you will see All Programs highlighted as shown in the figure below. This would give an idea that a new program(s) has been installed and that entry is in the Start menu.


Once you click on the program from the Start menu, the highlight will turn off. If you choose not to have the highlight feature then you may do so by performing the following steps:
1. Right-click on an empty space on the taskbar and click on Properties.
2. From the Taskbar and Start Menu Properties dialog box, click on the Start Menu tab. Click the Customize... button.
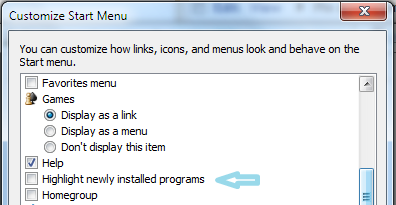
3. From the Customize Start Menu dialog box, in the You can customize how links, icons, and menus look and behave on the Start menu. section, scroll and click to remove the check mark beside Highlight newly installed programs.
4. Click OK to close Customize Start Menu dialog box.
5. Click Apply and then click OK to close Taskbar and Start Menu Properties dialog box.

Add Recent Items to the Start menu in Windows 7

By default, Recent Items button does not appear on the right pane in the Start menu. To add Recent Items button to the Start menu, perform the following:
1. Right-click on an empty space on the taskbar and click on Properties.
2. From the Taskbar and Start Menu Properties dialog box, click on the Start Menu tab.
3. In the Privacy, if there is no check mark beside Store and display recently opened items in the Start menu and the taskbar then click to place a check mark.
4. Click the Customize... button.
5. From the Customize Start Menu dialog box, in the You can customize how links, icons, and menus look and behave on the Start menu. section, scroll and click to place a check mark beside Recent Items.
6. Click OK twice.

Restore Windows 7 games and Games folder to Start menu

You access Games folder by clicking on the Start button and then All Programs. The Games folder includes the links to the games that come preinstalled with Windows 7 and the link to open Games Explorer window. We will see how to restore the games that is included in Windows 7 or the Games folder if they were removed.
A. Restore the games that is included in Windows 7
Perform the following steps if the links to the games in the Games folder is removed:
1. Click Start button and click on Control Panel.
2. Click on Programs if the View by: is Category. Click on Programs and Features if the View by: is Small icons or Large icons.
3. Click on Turn Windows features on or off to open Windows Features dialog box.
4. From the Windows Features dialog box, click to place a check mark beside Games.
5. Click OK.
B. Restore the Games folder
The Games folder includes the links to the games that come preinstalled with Windows 7 and the link to open Games Explorer window. To restore the Games folder, perform the steps as provided in the A. Restore the games that is included in Windows 7 section. Now, the Games folder and the game links will be added except the link to Games Explorer. To add the Games Explorer link to the Games folder, perform the following:
1. Click Start button . In Search programs and files, type games.
2. Under Programs, left-click on the Games Explorer link and drag it to the Start button . Continue dragging the Games Explorer icon till you reach All Programs, Games. Once you see the tip text of Games Explorer icon display Create link in Games, release the left mouse button.
3. Click on the Games-shortcut folder and drag and drop the target icon inside the Games folder.
4. Rename target to Games Explorer.
You may also refer to the following picture.