Topics

Apr 5, 2011

Auto Fill Options list contents while filling days in Excel 2007

Enter Monday in cell A1. Change the color of the text to Red and the font to Cambria. Click cell A1 (cell A1 will have a thick border with a tiny black square at the lower right corner. This tiny black square is called the Fill handle).
Place the mouse cursor over the fill handle and drag it down till cell A7. You will see Tuesday, Wednesday, Thursday, Friday, Saturday and Sunday entered in cells A2 to A7. You will also see the Auto Fill Options button at the lower right of cell A7. When you click the Auto Fill Options button, a list appears.
Eight options are available in the list. Depending on the data you are working, the options number change. When working with days, six options are displayed. The list options are:
  • Copy Cells
  • Fill Series
  • Fill Formatting Only
  • Fill Without Formatting
  • Fill Days
  • Fill Weekdays
Copy Cells – When you click this option, cells A2 to A7 will have the data Monday.
Fill Series – This option is selected by default.
Fill Formatting Only – When you click this option, cells A2 to A7 will be left blank. When you enter some data in these cells, they will have red colored text with Cambria font. This is because cell A1 has red colored text with Cambria font.
Fill Without Formatting – When you click this option, cells A2 to A7 will have Calibri, which is the default font with text color black. If you had selected a different font as the default then that font will be displayed in the cells.
Fill Days – This option performs the same operation as Fill Series i.e., filling the days Tuesday, Wednesday, Thursday, Friday, Saturday and Sunday.
Fill Weekdays – When you click this option, cells A2 to A5 will be filled with Tuesday, Wednesday, Thursday, and Friday. Cells A6 and A7 will be filled with Monday and Tuesday.

Apr 3, 2011

Auto Fill Options list contents while filling month names in Excel 2007

Enter January in cell A1. Change the color of the text to Red and the font to Cambria. Click cell A1 (cell A1 will have a thick border with a tiny black square at the lower right corner. This tiny black square is called the Fill handle).
Place the mouse cursor over the fill handle and drag it down till cell A4. You will see February, March, and April entered in cells A2, A3, and A4. You will also see the Auto Fill Options button at the lower right of cell A4. When you click the Auto Fill Options button, a list appears.

Eight options are available in the list. Depending on the data you are working, the options number change. When working with month names, five options are displayed. The list options are:
  • Copy Cells
  • Fill Series
  • Fill Formatting Only
  • Fill Without Formatting
  • Fill Months
Copy Cells – When you click this option, cells A2, A3, and A4 will have the data January.
Fill Series – This option is selected by default and will enter February, March, and April in cells A2, A3, and A4.
Fill Formatting Only – When you click this option, cells A2, A3, and A4 are left blank. When you enter data in these cells, the cells will have red colored text with Cambria font because cell A1 has red colored text with Cambria font.
Fill Without Formatting – When you click this option, cells A2, A3, and A4 will have Calibri, which is the default font with text color as black. If a different font is set as the default then that font will be displayed in the cells.
Fill Months – This option performs the same operation as Fill Series.

Apr 2, 2011

Double click the Fill handle to fill data quickly in Excel 2007

Normally you will place the mouse cursor over the fill handle and drag it to enter data automatically. You can add data even more quickly by double clicking the fill handle. In the image below, month names, minimum temperature and maximum temperature entries are entered.
Click cell A2 and double click the fill handle. You will see the entries February to December entered automatically.

Copy formatting using fill handle in Excel 2007

To copy formatting using fill handle, consider the following example:
In cell B2, type Calibri 16pt, change the color of text to red. On the Home tab, in the Font group, click the Font dropdown box and click Calibri and change the font size to 16.
In cell B3, type Cambria 14pt, change the background color of the cell to yellow. On the Home tab, in the Font group, click the Font dropdown box and click Cambria and change the font size to 14.

Select cells B2 and B3. Keep the right click mouse button in pressed state and drag the mouse cursor down to few cells (say till B6). You will see the list of options for Auto Fill. Click Fill Formatting Only.

Enter some information in cell B4, it will have the Calibri font with 16 point and color of the text will be red. Similarly in B5, the font will be Cambria with 14 point size and the background color of the cell will be yellow.

Copy data using the fill handle in Excel 2007

Select the cell or the range of cells that you need to copy. Press the CTRL key. Place the mouse cursor over the Fill handle. The mouse cursor will change to a double plus (a big plus and a small plus at top right). Keeping the CTRL key in pressed state, drag the mouse cursor.
Unlike the Copy and Paste, you can only copy the data to subsequent cells.

Example:
1. In cell A1, type Sunday and press the ENTER key.
2. Click cell A1.
3. Press the CTRL key and drag the fill handle till cell A4.
4. You will see Sunday being copied to cells A2, A3, and A4.
You can also perform the drag operation to the cells that are to the right, or left, or top.

You can also copy the data by keeping the right mouse button in pressed state and dragging the fill handle. You will see the list of options for Auto Fill. Click Copy Cells.

Copy the entry instead of filling the data series with the Fill handle in Excel 2007

Assume that Sunday is entered in cell A1. Click cell A1 and place the mouse cursor over the Fill handle and drag down. Monday will be entered in cell A2. Further dragging will have Tuesday in cell A3, Wednesday in cell A4 and so on. You have filled the data series with AutoFill.
If you do not want Monday, Tuesday, and Wednesday to appear but instead you want Sunday to appear in cells A2, A3, A4 and so on then press the CTRL key. Place the mouse cursor over the Fill handle. The mouse cursor will change to a double plus (a big plus and a small plus at top right). Keeping the CTRL key in pressed state, drag the mouse cursor. You will see Sunday in cells A2, A3, and so on.

Fill month names using the Fill handle in Excel 2007

Perform the following steps to fill the month names using the Fill handle:
1. In cell A1 type Jan or January and press the ENTER key.
2. Click cell A1. (Cell A1 will have a thick border with a tiny black square at the lower right corner. This tiny black square is called the Fill handle.)
3. Move the mouse pointer over the Fill handle and drag down until cell A12.
4. Release the mouse button or the pointing device button.
You will see the month names being filled automatically.

Fill days using the Fill handle in Excel 2007

Perform the following steps to fill the days using the Fill handle:
1. In cell A1 type Mon or Monday and press the ENTER key.
2. Click cell A1. (Cell A1 will have a thick border with a tiny black square at the lower right corner. This tiny black square is called the Fill handle.)
3. Move the mouse pointer over the Fill handle and drag down till A10.
4. Release the mouse button.

You will see the days being filled automatically.

Fill weekdays using the Fill handle in Excel 2007

Perform the following steps to fill the weekdays using the Fill handle:
1. In cell A1 type Mon or Monday and press the ENTER key.
2. Click cell A1. (Cell A1 will have a thick border with a tiny black square at the lower right corner. This tiny black square is called the Fill handle.)
3. Keep the right click mouse button in pressed state. Move the mouse pointer over the Fill handle and drag down till cell A10.
4. From the list of options for Auto Fill. Click Fill Weekdays.

You will see the weekdays being filled automatically. Once Tuesday, Wednesday, Thursday, Friday is filled in, you will see Monday, Tuesday and so on being filled.

Fill data that increases by a fixed unit using the fill handle in Excel 2007

For filling data that increased by a fixed unit, you must have at least data in two cells. The data can be numbers, dates, month names, and days.
Example:
1. In cell A1 enter 3. In cell A2 enter 6.
2. Click and select cells A1 and A2. You will see cells A1 and A2 highlighted with a tiny black square at the lower right corner at cell A2. This tiny black square is called the fill handle.
3. Place the mouse over the fill handle and drag it down. Excel automatically values like 9, 12, 15, and so on in cells in A3, A4, A5, and so on.

You may try entering Sunday in cell B1, Wednesday in cell B2 and try selecting cells B1, B2 and drag the fill handle.
Try date entries like 1/2/2011 in cell C1, 1/4/2011 in cell C2.
Try superscript and subscript entries, month names, text like World War 1, World War 2.

Fill handle

When you click a cell or select a range of cells, you will see a thick border with a tiny black square at the lower right corner. This tiny black square is called the Fill handle. The Fill handle allows saving a great deal of data entry time by filling in cells with data automatically. You use the Fill handle to:
  • Fill same data across multiple cells
  • Fill data series like date, time, week days, and month names
  • Fill data that increases by a fixed unit
  • Copy formulas to other cells
  • Copy cells
  • Copy formatting
You can also add your own custom lists. This increases usefulness of the fill handle.

Mar 14, 2011

Display or hide the fill handle in Excel 2007

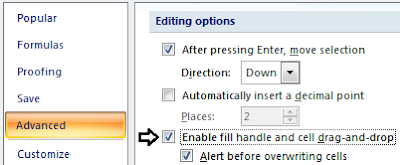
By default, Excel displays the fill handle. You can display or hide the fill handle by performing the following steps:
1. Open Microsoft Excel.
2. Click the Microsoft Office Button and click Excel Options.
3. From the Excel Options dialog box, click Advanced from the left pane.
4. From the right pane, under Editing options, do one of the following:
a. To display the fill handle: Click to     place a check mark besides Enable fill handle and cell drag-and-drop.
b. To hide the fill handle: Click to remove the check mark besides Enable fill handle and cell drag-and-drop.
5. Click OK.