To unhide worksheet(s), perform the following:
On the Home tab, in the Cells group, click Format, point to Hide & Unhide and click Unhide Sheet.
If multiple sheets are hidden, you will see the Unhide dialog box that will display all the hidden worksheets. Click the worksheet that you want to unhide and click OK. For unhiding multiple worksheets, you have to repeat the process of unhiding worksheet(s) and selecting the worksheet that you need to unhide.
Mar 31, 2011
Hide worksheet in Excel 2007
When you hide a worksheet, the data in the worksheet becomes invisible to others. You can hide a single worksheet or multiple worksheets at the same time. To hide multiple worksheets at the same time, you have to select the sheets first. Please be informed that you cannot hide all the worksheets. You must have at least one worksheet visible or unhidden. For information regarding selecting multiple worksheets, click the following web link:
Select or group multiple worksheets in Excel 2007
Once the selection of the worksheets is over, perform the following to hide the worksheet(s):
On the Home tab, in the Cells group, click Format, point to Hide & Unhide and click Hide Sheet.
Select or group multiple worksheets in Excel 2007
Once the selection of the worksheets is over, perform the following to hide the worksheet(s):
On the Home tab, in the Cells group, click Format, point to Hide & Unhide and click Hide Sheet.
Mar 12, 2011
Ungroup worksheets in Excel 2007
After grouping worksheets, you can ungroup few or all the worksheets by performing one of the following:
Ungroup few worksheets: Press the CTRL key. Keeping the CTRL key in pressed state, from the sheet tab area click the worksheet that you need to ungroup. If clicking the worksheets by holding the CTRL key, you can ungroup multiple worksheets.
Ungroup all worksheets: Right click any worksheet on the sheet tab area and click Ungroup Sheets.

Ungroup few worksheets: Press the CTRL key. Keeping the CTRL key in pressed state, from the sheet tab area click the worksheet that you need to ungroup. If clicking the worksheets by holding the CTRL key, you can ungroup multiple worksheets.
Ungroup all worksheets: Right click any worksheet on the sheet tab area and click Ungroup Sheets.
Mar 2, 2011
Freeze Panes in Excel 2007
If you are working with large worksheets that has headings in rows or columns and if you scroll down or across the worksheet, the headings will not be visible. To make the headings visible at all time, Excel allows you to freeze panes to lock rows and columns. You have the options of freezing the top row, top column or freezing multiple rows and/or columns.
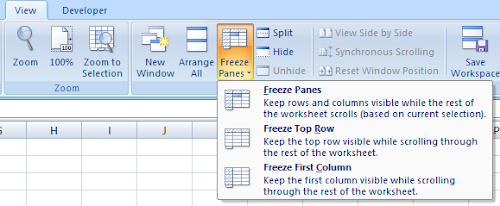
Freeze top row:
On the View tab, in the Window group click Freeze Panes and click Freeze Top Row.
Freeze top column:
On the View tab, in the Window group click Freeze Panes and click Freeze Top Column.
Freeze multiple rows and/or columns:
To freeze multiple rows, say 3 rows, click the first cell on the fourth row (cell A4). On the View tab, in the Window group click Freeze Panes and click Freeze Panes.
In general to freeze 'n' rows, click on the first cell in the 'n+1' row and perform the above procedure.
The same applies if you want to freeze multiple columns. For example, to freeze 2 columns, click on the first cell in the 3rd column (cell C1). On the View tab, in the Window group click Freeze Panes and click Freeze Panes.
To freeze multiple rows and multiple columns, say if you want to freeze 2 rows and 3 columns, click the cell below 2nd row and to the right of 3rd column, which in our case is the cell D3. In general to freeze x number of rows and y number of columns, move to the cell that is x+1 number towards right and y+1 number below.
Freeze top row:
On the View tab, in the Window group click Freeze Panes and click Freeze Top Row.
Freeze top column:
On the View tab, in the Window group click Freeze Panes and click Freeze Top Column.
Freeze multiple rows and/or columns:
To freeze multiple rows, say 3 rows, click the first cell on the fourth row (cell A4). On the View tab, in the Window group click Freeze Panes and click Freeze Panes.
In general to freeze 'n' rows, click on the first cell in the 'n+1' row and perform the above procedure.
The same applies if you want to freeze multiple columns. For example, to freeze 2 columns, click on the first cell in the 3rd column (cell C1). On the View tab, in the Window group click Freeze Panes and click Freeze Panes.
To freeze multiple rows and multiple columns, say if you want to freeze 2 rows and 3 columns, click the cell below 2nd row and to the right of 3rd column, which in our case is the cell D3. In general to freeze x number of rows and y number of columns, move to the cell that is x+1 number towards right and y+1 number below.
Feb 12, 2011
Select or group multiple worksheets in Excel 2007
At times, you may need to select multiple worksheets in order to perform operations at the same time like:
To select multiple sheets, on the sheet tab bar, do one of the following:
Selecting adjacent worksheets: Click on a sheet tab and then press the Shift key. Keep the Shift key in pressed state, click to select the last worksheet.
 Selecting non-adjacent worksheets: Click on a sheet tab and then press the Ctrl key. Keep the Ctrl key in pressed state, click to select other worksheets.
 Selecting All Sheets: Right click on any sheet tab and click Select All Sheets.
- Inserting and deleting multiple sheets
- Entering and editing data in multiple sheets
- Moving or copying multiple sheets
- Showing or hiding row and column headers for multiple sheets
- Coloring the sheet tab for multiple sheets
- Hiding or unhiding multiple sheets
- Showing or hiding gridlines for multiple sheets
- Displaying zero or empty cell for cells that has zero value for multiple sheets
- Showing or hiding page breaks for multiple sheets
- Showing or hiding outline symbols if an outline is applied for multiple sheets
- Showing or hiding formulas in cells instead of their calculated results
To select multiple sheets, on the sheet tab bar, do one of the following:
Selecting adjacent worksheets: Click on a sheet tab and then press the Shift key. Keep the Shift key in pressed state, click to select the last worksheet.
Remove background image from worksheet in Excel 2007

1. Click the worksheet that has the background image.
2. Click Page Layout tab. In the Page Setup group, click Delete Background.

Add a background image to worksheet in Excel 2007

1. Open the workbook and click the worksheet from the sheet tab bar for which you need to add a background image.


Feb 10, 2011
Copy a worksheet to another workbook in Excel 2007
When you have multiple workbooks and you feel that certain worksheets need to be placed in a workbook. For example, Book1 with worksheets Sheet11, Sheet12, Sheet13. Book2 with worksheets Sheet21, Sheet22, Sheet23. Book3 with worksheets Sheet31, Sheet32, Sheet33. You need to have a copy of worksheets Sheet11 from Book1 and Sheet22 from Book2 into the workbook Book3. Perform the following to do so:
1. Open all the workbooks (Book1, Book2, and Book3).
2. On the sheet tab bar of Book1, click the worksheet Sheet11.
3. Right-click the worksheet and click Move or Copy... to open the Move or Copy dialog box. 4. In the Move or Copy dialog box, click the To book: dropdown box and click Book3.xlsx. In the Before sheet: dropdown box, specify a location for the copied worksheet. For example, to place the worksheet at the end of the existing worksheets, click (move to end). To move to a location between two worksheets, say between Sheet22 and Sheet33, click the worksheet that is to the right, in this example, it is Sheet33.
5. Click to place a checkmark besides Create a copy.
6. Click OK.
1. Open all the workbooks (Book1, Book2, and Book3).
2. On the sheet tab bar of Book1, click the worksheet Sheet11.
3. Right-click the worksheet and click Move or Copy... to open the Move or Copy dialog box.
5. Click to place a checkmark besides Create a copy.
6. Click OK.
Copy a worksheet in the same workbook in Excel 2007
1. On the sheet tab bar, click the worksheet that you need to copy.
2. Right-click the worksheet and click Move or Copy... to open the Move or Copy dialog box.
3. In the Move or Copy dialog box, specify a location for the copied worksheet. For example, to place the worksheet at the end of the existing worksheets, click (move to end). To move to a location between two worksheets, say between Sheet2 and Sheet3, click the worksheet that is to the right, in this example, it is Sheet3.
4. Click to place a checkmark besides Create a copy.
5. Click OK.


Move worksheets using drag-and-drop in Excel 2007
At times, you may require to move worksheets from its current location to other place within the same workbook. There is more than one way to do this. The drag-and-drop way is the easiest one. You can move the worksheets by clicking the worksheet from the sheet tab area and dragging it to other place in the sheet tab area. While dragging the worksheet tab, you will see that the mouse cursor changes to an arrow with a small book. While you drag, you will see a small black triangle. The small triangle indicates the place where you can drop the worksheet.
In the image below, Sheet5 is being moved to the end.
In the image below, Sheet5 is being moved to the end.
Feb 8, 2011
Adjust sheet tab area to make more or fewer tabs visible

 , click and drag towards left to make fewer tabs visible or move towards right to make more tabs visible.
Note:
Adjusting the sheet tab bar area will also resize the horizontal scroll bar.
Display or hide sheet tabs in Excel 2007
1. Open Microsoft Excel.
2. Click the Microsoft Office Button
 and click Excel Options.
3. From the Excel Options dialog box, click Advanced from the left pane.
4. From the right pane, under Display options for this workbook:, do one of the following:
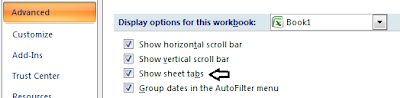
a. To display the sheet tabs, click to place a checkmark besides Show sheet tabs.
b. To hide the sheet tabs, click to remove the checkmark besides Show sheet tabs.
5. Click OK.
Move worksheets to another workbook in Excel 2007
When you have many workbooks and need to have a single workbook that will have all the worksheets that you need. To move worksheets around, you need to have all the workbooks opened.
For this example, we will have two workbooks named W1.xlsx and W2.xlsx.
W1.xlsx has 3 worksheets named W1 - Sheet 1, W1 - Sheet 2, and W1 - Sheet 3.
W2.xlsx has 3 worksheets named W2 - Sheet 1, W2 - Sheet 2, and W2 - Sheet 3.
We will move the worksheet W1 - Sheet 3 from W1.xlsx to W2.xlsx. Perform the following steps to move the worksheet:
1. Open the workbooks W1.xlsx and W2.xlsx.
2. In workbook W1.xlsx, click on the sheet tab W1 - Sheet3.
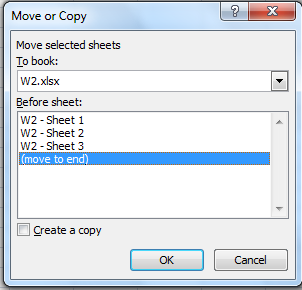
 3. On the Home tab, in the Cells group click Format, and click Move or Copy Sheet... to open the Move or Copy dialog box.
 4. From the Move or Copy dialog box, click the To book: dropdown box and click W2.xlsx
5. To move the worksheet to the end of the existing worksheets in W2.xlsx, click (move to end) and click OK.
6. To move the worksheet between any one of the worksheets (for example, between W2 - Sheet 1 and W2 - Sheet2, click W2 - Sheet 2) and click OK.
Note:
The worksheet W1 - Sheet 3 will be moved to the workbook W2.xlsx and will no longer appear in the workbook W1.xlsx. If you need to have a copy of the worksheet W1 - Sheet 3 in W1.xlsx then click to place the checkmark besides Create a copy and click OK.
You can also select and move multiple sheets at one time. To select multiple sheets, do the following:
Selecting all worksheets: Right click on any sheet tab and click Select All Sheets.
 Selecting adjacent worksheets: Click on a worksheet and then press the Shift key. Keep the Shift key in pressed state, click to select the last worksheet.
 Selecting non-adjacent worksheets: Click on a worksheet and then press the Ctrl key. Keep the Ctrl key in pressed state, click to select other worksheets.
For this example, we will have two workbooks named W1.xlsx and W2.xlsx.
W1.xlsx has 3 worksheets named W1 - Sheet 1, W1 - Sheet 2, and W1 - Sheet 3.
W2.xlsx has 3 worksheets named W2 - Sheet 1, W2 - Sheet 2, and W2 - Sheet 3.
We will move the worksheet W1 - Sheet 3 from W1.xlsx to W2.xlsx. Perform the following steps to move the worksheet:
1. Open the workbooks W1.xlsx and W2.xlsx.
2. In workbook W1.xlsx, click on the sheet tab W1 - Sheet3.
5. To move the worksheet to the end of the existing worksheets in W2.xlsx, click (move to end) and click OK.
6. To move the worksheet between any one of the worksheets (for example, between W2 - Sheet 1 and W2 - Sheet2, click W2 - Sheet 2) and click OK.
Note:
The worksheet W1 - Sheet 3 will be moved to the workbook W2.xlsx and will no longer appear in the workbook W1.xlsx. If you need to have a copy of the worksheet W1 - Sheet 3 in W1.xlsx then click to place the checkmark besides Create a copy and click OK.
You can also select and move multiple sheets at one time. To select multiple sheets, do the following:
Selecting all worksheets: Right click on any sheet tab and click Select All Sheets.
Move worksheets to another location in the same workbook in Excel 2007
At times you may need to move your worksheets to other locations. Perform the following to move a single worksheet or multiple worksheets to another location in the same workbook. For moving multiple worksheets, you have to first select the worksheets.
Selecting adjacent worksheets: Click on a worksheet and then press the Shift key. Keep the Shift key in pressed state, click to select the last worksheet.Selecting non-adjacent worksheets: Click on a worksheet and then press the Ctrl key. Keep the Ctrl key in pressed state, click to select other worksheets.Once the selection is over (a single worksheet or multiple worksheets), perform the following to move the worksheet(s):
1. On the Home tab, in the Cells group click Format and click Move or Copy Sheet... to open the Move or Copy dialog box.
2. You have the option to move the worksheet(s) to the end in the sheet tab area or before a particular worksheet. To move the worksheet(s) to a location, say between Sheet2 and Sheet3, click Sheet3.
3. Click OK.
Selecting adjacent worksheets: Click on a worksheet and then press the Shift key. Keep the Shift key in pressed state, click to select the last worksheet.
1. On the Home tab, in the Cells group click Format and click Move or Copy Sheet... to open the Move or Copy dialog box.
3. Click OK.
Feb 6, 2011
Enter data in multiple worksheets at the same time in Excel 2007
Data entered in a cell can be produced exactly into other worksheets with out performing the copy & paste thing. For example, if your workbook has 3 sheets labeled Sheet1, Sheet2, Sheet3 and in Sheet1's B5 cell you enter Excel 2007 tips then the same data will appear in cell B5 in Sheet2 provided that you had selected Sheet1 and Sheet2.
In other words, you group worksheets by selecting multiple sheets. Enter some data in the selected sheet and see the exact data appear in other sheets.
To select multiple sheets, do the following:
Selecting all worksheets: Right click on any sheet tab and click Select All Sheets.
Selecting adjacent worksheets: Click on a worksheet and then press the Shift key. Keep the Shift key in pressed state, click to select the last worksheet.Selecting non-adjacent worksheets: Click on a worksheet and then press the Ctrl key. Keep the Ctrl key in pressed state, click to select other worksheets.Now enter some information in any of the selected sheets. You will see the same information in other worksheets. Clicking unselected worksheet tab ungroups the sheets.
In other words, you group worksheets by selecting multiple sheets. Enter some data in the selected sheet and see the exact data appear in other sheets.
To select multiple sheets, do the following:
Selecting all worksheets: Right click on any sheet tab and click Select All Sheets.
Delete worksheets in Excel 2007
Worksheets that you no longer need can be deleted. You can delete a single worksheet or you can delete multiple worksheets at the same time. To delete multiple worksheets, you have to select the worksheets first. Do the following to select multiple worksheets:
Selecting adjacent worksheets: Click on a sheet tab and then press the Shift key. Keep the Shift key in pressed state, click to select the last worksheet.
Selecting non-adjacent worksheets: Click on a sheet tab and then press the Ctrl key. Keep the Ctrl key in pressed state, click to select other worksheets.
 Note:
Note:
You cannot select all the worksheets to delete. You will receive the message saying A workbook must contain at least one visible worksheet
Once the selection of the worksheet(s) is over, in the Home tab, in the Cells group, click Delete and click Delete Sheet.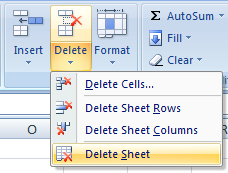 You will be presented with a message box saying that Data may exist in the sheet(s) selection for deletion. To permanently delete the data, press Delete., click Delete.
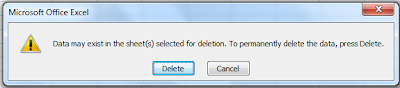 If your worksheet does not contain data then the above message box will not appear.
You can also right-click the sheet tab of a worksheet or any of the selected worksheets sheet tab and click Delete to delete the worksheet(s).
Selecting adjacent worksheets: Click on a sheet tab and then press the Shift key. Keep the Shift key in pressed state, click to select the last worksheet.
Selecting non-adjacent worksheets: Click on a sheet tab and then press the Ctrl key. Keep the Ctrl key in pressed state, click to select other worksheets.
You cannot select all the worksheets to delete. You will receive the message saying A workbook must contain at least one visible worksheet
Once the selection of the worksheet(s) is over, in the Home tab, in the Cells group, click Delete and click Delete Sheet.
You can also right-click the sheet tab of a worksheet or any of the selected worksheets sheet tab and click Delete to delete the worksheet(s).
Add multiple worksheets at the same time in Excel 2007
In Excel 2007, you add a worksheet by right clicking on a sheet tab and clicking Insert... (or) by clicking the Insert Worksheet button (or) by pressing Shift + F11. This action adds a single worksheet.
 For adding multiple worksheets at the same time, you need to have more than one worksheet in your workbook.
For example, to add 2 worksheets, click on a sheet tab and press the Ctrl key from the keyboard. Keeping the Ctrl key in pressed state, click on the other sheet tab. Now, right-click on any selected sheet tab and click Insert...
It works like this, the number of sheet tabs that you select and click on Insert..., those many number of worksheets will be added.
For example, to add 2 worksheets, click on a sheet tab and press the Ctrl key from the keyboard. Keeping the Ctrl key in pressed state, click on the other sheet tab. Now, right-click on any selected sheet tab and click Insert...
It works like this, the number of sheet tabs that you select and click on Insert..., those many number of worksheets will be added.
Change the tab color of the worksheet in Excel 2007
Microsoft Excel provides the option of coloring the worksheet tab. You do this to identify the worksheets that have identical or meaningful information that suits your needs. You can also select multiple worksheets and apply the tab color at the same time. To select multiple worksheets do the following:
Selecting all worksheets: Right click on the sheet tab and click Select All Sheets.
Selecting adjacent worksheets: Click on a worksheet and then press the Shift key. Keep the Shift key in pressed state, click to select the last worksheet.
Selecting non-adjacent worksheets: Click on a worksheet and then press the Ctrl key. Keep the Ctrl key in pressed state, click to select other worksheets.
Once the selection of the worksheets is over, perform the following steps to color a worksheet tab:
1. Open Microsoft Excel and open the workbook for which you need to color the worksheet tab.
2. Click the worksheet that needs the tab coloring.
3. From the Home tab, in the Cells group click Format and point to Tab Color and select a color.
You can also right click on the worksheet tab and point to Tab Color and make a color selection.
Selecting all worksheets: Right click on the sheet tab and click Select All Sheets.
Selecting adjacent worksheets: Click on a worksheet and then press the Shift key. Keep the Shift key in pressed state, click to select the last worksheet.
Selecting non-adjacent worksheets: Click on a worksheet and then press the Ctrl key. Keep the Ctrl key in pressed state, click to select other worksheets.
1. Open Microsoft Excel and open the workbook for which you need to color the worksheet tab.
2. Click the worksheet that needs the tab coloring.
3. From the Home tab, in the Cells group click Format and point to Tab Color and select a color.
You can also right click on the worksheet tab and point to Tab Color and make a color selection.
Change the gridline color in Excel 2007
You can customize the look of the worksheet by applying a different color to the gridlines. You can change the gridline for a single worksheet or you can select multiple worksheets and change the gridlines color at the same time. To select multiple worksheets do the following:
Selecting all worksheets: Right click on the sheet tab and click Select All Sheets.
Selecting adjacent worksheets: Click on a sheet tab and then press the Shift key. Keep the Shift key in pressed state, click to select the last worksheet.
Selecting non-adjacent worksheets: Click on a sheet tab and then press the Ctrl key. Keep the Ctrl key in pressed state, click to select other worksheets.
Once the selection of the worksheet(s) is over, perform the following steps to change the gridline color:
1. Open Microsoft Excel.
2. Click the Microsoft Office Button and click Excel Options.
3. From the Excel Options dialog box, click Advanced from the left pane.
4. From the right pane, scroll the list. Under Display options for this worksheet: make sure that the Show gridlines is checked. Click the Gridline color box and select a color.
5. Click OK.

Selecting all worksheets: Right click on the sheet tab and click Select All Sheets.
Selecting adjacent worksheets: Click on a sheet tab and then press the Shift key. Keep the Shift key in pressed state, click to select the last worksheet.
Selecting non-adjacent worksheets: Click on a sheet tab and then press the Ctrl key. Keep the Ctrl key in pressed state, click to select other worksheets.
1. Open Microsoft Excel.
2. Click the Microsoft Office Button
and click Excel Options.3. From the Excel Options dialog box, click Advanced from the left pane.
4. From the right pane, scroll the list. Under Display options for this worksheet: make sure that the Show gridlines is checked. Click the Gridline color box and select a color.
5. Click OK.
Rename worksheet in Excel 2007
When you open a new workbook then Microsoft Excel includes three worksheets labeled Sheet1, Sheet2, and Sheet3. If you add more worksheets then the labels of the newly added worksheets will be Sheet4, Sheet5 and so on. If you are not comfortable with the names of the worksheets then you can rename the worksheets. Perform the following steps to rename the worksheet:
1. Open Microsoft Excel and open the workbook for which you need to rename the worksheet.
2. Click the worksheet that you need to rename (for example: Sheet2). From the Home tab, in the Cells group, click Format, and click Rename Sheet.
3. The text in the worksheet tab gets selected now. Rename the worksheet and press the Enter key.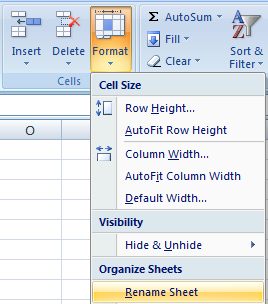 Other ways of renaming a worksheet is by double clicking the worksheet tab and renaming (or) right-clicking the worksheet tab and clicking Rename.
1. Open Microsoft Excel and open the workbook for which you need to rename the worksheet.
2. Click the worksheet that you need to rename (for example: Sheet2). From the Home tab, in the Cells group, click Format, and click Rename Sheet.
3. The text in the worksheet tab gets selected now. Rename the worksheet and press the Enter key.
Worksheet names can be up to 31 characters long and can include spaces. However, you cannot enter the following characters:
* (Asterisk), / (Forward slash), \ (Backward slash), ? (Question mark), and : (Colon).
Subscribe to:
Posts (Atom)