To lock the taskbar, right-click on an empty space on the taskbar and place a check mark beside Lock the taskbar.
To unlock the taskbar, right-click on an empty space on the taskbar and click to clear the check mark beside Lock the taskbar.
Feb 5, 2011
Resize the taskbar in Windows 7
To resize the taskbar, you have to uncheck the Lock the taskbar if the check mark appears beside Lock the taskbar. Perform the following to resize the taskbar:
1. Right-click on an empty space in the taskbar and click to uncheck the Lock the taskbar.
2. Move the mouse to the top of the taskbar till to see the cursor. Now, left-click on the mouse and drag to resize the taskbar.
1. Right-click on an empty space in the taskbar and click to uncheck the Lock the taskbar.
2. Move the mouse to the top of the taskbar till to see the
cursor. Now, left-click on the mouse and drag to resize the taskbar.
Show or hide the taskbar in Windows 7
By default, the taskbar appears at the bottom of the screen. To view the taskbar if you do not see it on the computer screen, move the mouse cursor to the bottom of the screen. If the taskbar does not appear at the bottom of the screen then try moving the mouse to the top, right, or left part of the screen. You may also press the Windows Logo key  to view the Start menu.
to view the Start menu.To hide the taskbar, perform the following steps:
1. Right-click on an empty space on the taskbar and click on Properties.
2. From the Taskbar and Start Menu Properties dialog box, under Taskbar appearance, click to place the check mark beside the Auto-hide the taskbar.
3. Click Apply and click OK.
1. Right-click on an empty space on the taskbar and click on Properties.
2. From the Taskbar and Start Menu Properties dialog box, under Taskbar appearance, click to place the check mark beside the Auto-hide the taskbar.
3. Click Apply and click OK.
Turn off auto-hide in Windows 7
If the auto-hide the taskbar feature is turned on then the taskbar would appear only if you hover the mouse over the taskbar. You may turn off the Auto-hide the taskbar feature to make the taskbar visible always. Perform the following to turn off this feature.
1. Right-click on an empty space on the taskbar and click on Properties.
2. From the Taskbar and Start Menu Properties dialog box, under Taskbar appearance, click to remove the check mark beside the Auto-hide the taskbar.
3. Click Apply and click OK.
1. Right-click on an empty space on the taskbar and click on Properties.
2. From the Taskbar and Start Menu Properties dialog box, under Taskbar appearance, click to remove the check mark beside the Auto-hide the taskbar.
3. Click Apply and click OK.
Show text beside the buttons on the taskbar in Windows 7
By default, the text that is beside the buttons on the taskbar is hidden. You may make the text appear bedise the taskbar button by performing the following steps:
1. Right-click on an empty space on the taskbar and click on Properties.
2. From the Taskbar and Start Menu Properties dialog box, under Taskbar appearance section, click on the Taskbar buttons: drop-down box, select Combine when the taskbar is full or Never combine.
3. Click Apply and then click OK.
2. From the Taskbar and Start Menu Properties dialog box, under Taskbar appearance section, click on the Taskbar buttons: drop-down box, select Combine when the taskbar is full or Never combine.
3. Click Apply and then click OK.
Open a new instance of the program from the taskbar in Windows 7
If a particular program supports multiple instances then hold the Shift key and click the program on the taskbar to open a new instance of the program.
Find the taskbar in Windows 7
By default, the taskbar is located at the bottom of the desktop. If the taskbar is not visible then check whether the Auto-hide the taskbar option is turned on. Also, if you are using multiple monitors then the taskbar would appear on only one computer. You may press the Windows logo key to view the taskbar.
to view the taskbar.To turn off auto-hide, perform the following:
1. Right-click on an empty space on the taskbar and click on Properties.
2. From the Taskbar and Start Menu Properties dialog box, under Taskbar appearance, click to remove the check mark beside the Auto-hide the taskbar.
3. Click Apply and click OK.
1. Right-click on an empty space on the taskbar and click on Properties.
2. From the Taskbar and Start Menu Properties dialog box, under Taskbar appearance, click to remove the check mark beside the Auto-hide the taskbar.
3. Click Apply and click OK.
Pin a program to the taskbar in Windows 7
If the program is running then right-click the program from the taskbar and click on Pin this program to taskbar.
You may also pin a program from Start menu or by locating the program on your computer and then right-clicking on it and clicking on Pin to taskbar option.
You may also drag the program from the desktop, Start menu, or from any location on the computer to the taskbar to pin the program to the taskbar.
To unpin a program from the taskbar, right-click on the program and click on Unpin this program from taskbar.
Choose how icons will appear on the taskbar in Windows 7
You have three choices to make as to how the icons would appear on the taskbar. They are:
- Always combine, hide labels This is the default setting. Each program appears as a single, unlabeled icon, even when multiple items for a program are open.
- Combine when taskbar is full This setting shows each item as an individual, labeled icon. When the taskbar becomes crowded, programs with multiple open items collapse into a single program icon. Clicking the icon displays a list of the items that are open.
- Never combine This setting is similar to Combine when taskbar is full, except icons never collapse into a single icon, regardless of how many windows are open. As more programs and windows open, icons decrease in size and eventually scroll within the taskbar.
The above text has been copied as is from Microsoft for easy understanding.
To make the appropriate choice for the taskbar buttons to appear, perform the following steps:
1. Right-click on an empty space on the taskbar and click on Properties.
2. From the Taskbar and Start Menu Properties dialog box, under Taskbar appearance section, click on the Taskbar buttons: drop-down box, select one of the following:
1. Right-click on an empty space on the taskbar and click on Properties.
2. From the Taskbar and Start Menu Properties dialog box, under Taskbar appearance section, click on the Taskbar buttons: drop-down box, select one of the following:
- Always combine, hide labels
- Combine when taskbar is full
- Never combine
Rearrange icons on the taskbar in Windows 7
Windows 7 is the first of its kind in the family of Microsoft's operating system's that allows users to rearrange program icons on the taskbar. To rearrange the icons, left-click on the program and drag it to the left or right.
How to make the taskbar icons smaller in Windows 7
By default, the icons on the taskbar appear large. You can change this setting and make smaller icons to have more space on the taskbar. To use small icons on the taskbar, perform the following steps:
1. Right-click on an empty space on the taskbar and click on Properties.
2. From the Taskbar and Start Menu Properties dialog box, under Taskbar appearance section, click to place a check mark beside Use small icons.
3. Click Apply and then click OK.
2. From the Taskbar and Start Menu Properties dialog box, under Taskbar appearance section, click to place a check mark beside Use small icons.
3. Click Apply and then click OK.
To use the default setting, click to clear the check mark beside Use small icons.
Add Recycle Bin icon to the taskbar in Windows 7
In Windows 7, when you drag-and-drop Recycle Bin to the taskbar, it get's pinned to Windows Explorer on the taskbar. If you need to add the Recycle Bin icon to the taskbar then make sure that the Recycle Bin icon is on the desktop and then perform the following:
1. Right-click on an empty space on the desktop, point to New and click on Folder.
2. Rename the New Folder to My Toolbar.
3. Drag-and-drop the Recycle Bin icon to the My Toolbar folder.
4. In the taskbar, right-click on an empty space, click to clear the check mark beside Lock the taskbar. Right-click on an empty space on the taskbar and point to Toolbars and click New toolbar...
5. From the New Toolbar - Choose a folder dialog box that opens, locate the My Toolbar folder from the desktop. Click to highlight the My Toolbar folder and then click on the Select Folder button.
6. My Toolbar folder appears on the taskbar. Now, you have to hide the labels and make the Recycle Bin icon large. To do this,
8. Right-click on an empty space on the taskbar and click to place a check mark beside Lock the taskbar.
1. Right-click on an empty space on the desktop, point to New and click on Folder.
2. Rename the New Folder to My Toolbar.
3. Drag-and-drop the Recycle Bin icon to the My Toolbar folder.
4. In the taskbar, right-click on an empty space, click to clear the check mark beside Lock the taskbar. Right-click on an empty space on the taskbar and point to Toolbars and click New toolbar...
5. From the New Toolbar - Choose a folder dialog box that opens, locate the My Toolbar folder from the desktop. Click to highlight the My Toolbar folder and then click on the Select Folder button.
6. My Toolbar folder appears on the taskbar. Now, you have to hide the labels and make the Recycle Bin icon large. To do this,
- Right-click on My Toolbar and click to clear the check mark beside Show Text and Show title.
- Right-click on My Toolbar, point to View, click Large Icons.
8. Right-click on an empty space on the taskbar and click to place a check mark beside Lock the taskbar.
Change the taskbar hover time in Windows 7
Windows 7 displays a preview of the window when you hover the mouse over a taskbar item. The default mouse hover time is 400 milliseconds. You can change the mouse hover time to make the preview window appear soon or late. To change the taskbar hover time, perform the following:
1. Click the Start button . In the Search programs and files box, type regedit and press the Enter key from the keyboard.
2. Navigate to HKEY_CURRENT_USER\Control Panel\Mouse. From the right pane, double-click on MouseHoverTime to edit. (You can also right-click MouseHoverTime and click on Modify).
3. Change the value in the Value data: field.
1. Click the Start button
. In the Search programs and files box, type regedit and press the Enter key from the keyboard.2. Navigate to HKEY_CURRENT_USER\Control Panel\Mouse. From the right pane, double-click on MouseHoverTime to edit. (You can also right-click MouseHoverTime and click on Modify).
3. Change the value in the Value data: field.
Make the taskbar of Windows 7 appear like Windows Vista
By default, the icons on the taskbar in Windows 7 appear large and also the labels for the icons are hidden and if multiple instances of a program are opened, they are displayed as a single icon with the taskbar icon image changing when multiple instances appear. On the other hand, the icons on the taskbar are small and appear with labels and get combined when the taskbar is full in Windows Vista. You may make this setting in Windows 7. You may not get the appearance like Windows Vista but it has a closer resemblance. Perform the following steps to achieve this:
 1. Right-click on an empty space on the taskbar and click on Properties.
2. From the Taskbar and Start Menu Properties dialog box, under Taskbar appearance section, click to place a checkmark beside Use small icons. Click on the Taskbar buttons: drop-down box, select Always combine, hide labels.
3. Click Apply and then click OK.
The result of the above steps is shown in the figure below
Move the taskbar in Windows 7
In previous versions of Microsoft Windows, you have to first unlock the taskbar in order to move the taskbar to the right, left, or top (assuming that the taskbar is at the bottom). In Windows 7, you may move the taskbar without unlocking the taskbar. Perform the following steps to move the taskbar: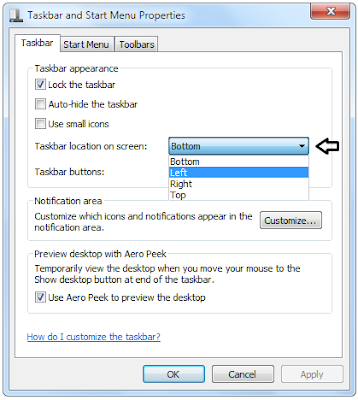
1. Right-click on an empty space on the taskbar and click on Properties.
2. From the Taskbar and Start Menu Properies dialog box, in the Tasbar appearance section, click on the Taskbar location on screen: drop-down box to choose Bottom or Left or Right or Top.
3. Click Apply and click OK.
2. From the Taskbar and Start Menu Properies dialog box, in the Tasbar appearance section, click on the Taskbar location on screen: drop-down box to choose Bottom or Left or Right or Top.
3. Click Apply and click OK.
You may also move the taskbar by left-clicking the mouse button and dragging the taskbar to the Bottom or Left or Right or Top. However, you have to unlock the taskbar first if the Lock the taskbar has a check mark beside it. To unlock the taskbar, right-click on an empty space on the taskbar and click Lock the taskbar.
Show or hide the volume icon in Windows 7 taskbar
The Volume icon appears on the right part of the taskabar in Windows 7 provided that the taskbar is at the bottom of the screen. If the volume icon does not appear on the notification area in the taskbar then it might be turned off. You may perform the following steps to show or hide the volume icon.
1. Right-click Start button and click Properties to open Taskbar and Start Menu Properties dialog box.
2. Click the Taskbar tab. In the Notification area section, click Customize... button.
3. From the Select which icons and notifications appear on the taskbar window, click Turn system icons on or off.
 4. From the Turn system icons on or off window, do one of the following:
To show the volume icon on the notification area in the taskbar, click the Volume drop-down box and click On and then click OK.
To hide the volume icon on the notification area in the taskbar, click the Volume drop-down box and click Off and then click OK.
 5. Click OK again to close Select which icons and notifications appear on the taskbar window.
6. Close the Taskbar and Start Menu Properties dialog box by clicking OK.
1. Right-click Start button
and click Properties to open Taskbar and Start Menu Properties dialog box.2. Click the Taskbar tab. In the Notification area section, click Customize... button.
3. From the Select which icons and notifications appear on the taskbar window, click Turn system icons on or off.
4. From the Turn system icons on or off window, do one of the following:To show the volume icon on the notification area in the taskbar, click the Volume drop-down box and click On and then click OK.
To hide the volume icon on the notification area in the taskbar, click the Volume drop-down box and click Off and then click OK.
5. Click OK again to close Select which icons and notifications appear on the taskbar window.6. Close the Taskbar and Start Menu Properties dialog box by clicking OK.
Change the Number of Recent Items in Jump List
When you right-click on a taskbar icon, you will see a list of documents, pictures, songs, or websites depending on the program that you had right-clicked. For example, right-clicking Internet Explorer will display a list of frequently viewed websites, pinned websites (if any). By default, there are 10 items displayed in the jump list. You can change this number and can increase or decrease the number by performing the following steps:
1. Right-click on an empty space on the taskbar and click on Properties.
2. From the Taskbar and Start Menu Properties dialog box, click on the Start Menu tab. Click Customize… button.
3. From the Customize Start Menu dialog box, under Start menu size section, set a new value for Number of recent items to display in Jump Lists option.
4. Click OK twice.
Access taskbar button Jump List without right-click in Windows 7
Jump lists appear when you right-click on a taskbar icon. You will see a list of documents, pictures, songs, or websites depending on the program that you had right-clicked. For example, right-clicking Internet Explorer will display a list of frequently viewed websites, pinned websites (if any). You can also make the Jump lists to appear by left-clicking on the taskbar button and moving the mouse up. Doing so, the Jump list will pop-up.
Subscribe to:
Comments (Atom)