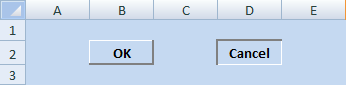
 When you apply proper border color and color fill to the cell, you have raised and sunken effect that appears in a button. In the figure to the right, you will see cell B2 has the raised effect and cell D2 has sunken effect. You can create this effect by performing the following:
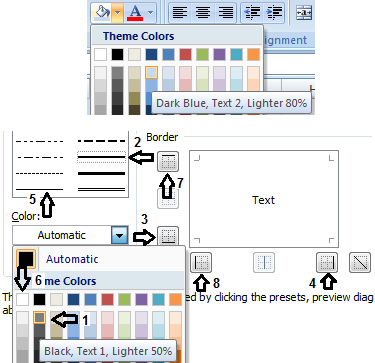 1. Color the background for cells A1 to E3: Click cell A1. Press the SHIFT key. Keeping the SHIFT key in pressed state, click cell E3. On the Home tab, in the Font group, click the arrow in the Fill Color command and click Dark Blue, Text 2, Lighter 80%.
2. Apply the raised effect for cell B2: Click cell B2. Press CTRL + 1 to open Format Cells dialog box.
3. Click the Border tab and do the following:
I. Under Color: click the DOWN arrow, click Black, Text 1, Lighter 50% color. (labeled 1 in the figure).
II. Under Style: click the line as shown in the figure with the label 2.
III. Under Border, click the Bottom Border button (labeled 3) and click Right Border button (labeled 4).
IV. Under Style: click the line as shown in the figure with the label 5.
V. Under Color: click White, Background 1 (labeled 6).
VI. Under Border, click the Left Border button (labeled 7) and click Top Border button (labeled 8).
4. Click OK.
 5. Apply the sunken effect for cell D2: Click cell D2. Press CTRL + 1 to open Format Cells dialog box.
6. Click the Border tab and do the following:
I. Under Color: click the DOWN arrow, click Black, Text 1, Lighter 50% color. (labeled 1 in the figure).
II. Under Style: click the line as shown in the figure with the label 2.
III. Under Border, click the Left Border button (labeled 3) and click Top Border button (labeled 4).
IV. Under Style: click the line as shown in the figure with the label 5.
V. Under Color: click White, Background 1 (labeled 6).
VI. Under Border, click the Right Border button (labeled 7) and click Bottom Border button (labeled 8).
7. Click OK.
1 comments:
Would be great to have a procedure Sub RangeSunken(ByVal r As Range) which does the job - and analogous one called RangeRaised. Fairly easy when doing it is recorded as Macro.
Post a Comment